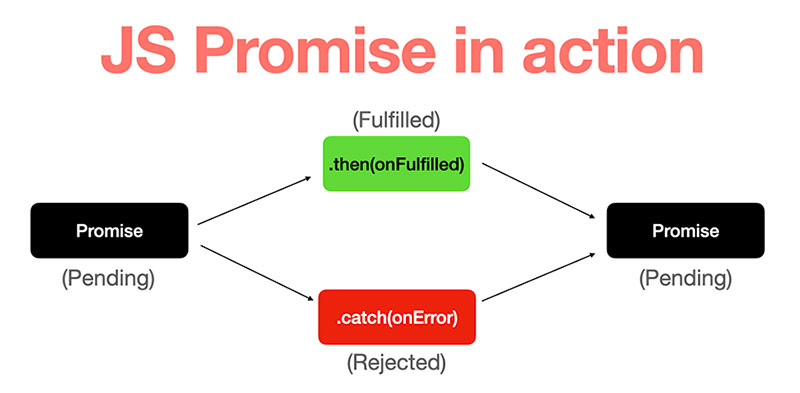
最近SEO禅都在巩固复习基础知识,把自己对前端基础知识的理解记录下来,这些都是自己的看法,并不一定对,SEO禅只是觉得这样理解对自己来说合情合理,符合逻辑,所以要是觉得SEO禅有哪里说错的地方,可以评论留言指出,欢迎批判指正。
Promise是什么?
首先学习Promise之前,我们要搞清楚Promise是什么的问题,引用MDN上面的一句话:
本质上 Promise 是一个函数返回的对象,我们可以在它上面绑定回调函数,这样我们就不需要在一开始把回调函数作为参数传入这个函数了。
https://developer.mozilla.org/zh-CN/docs/Web/JavaScript/Guide/Using_promises
也就是说Promise改变了我们传统的异步编程方式(前端),传统的异步需要把回调函数当作参数传入,Promise可以使用类似链式调用的方式(return this,但是promise返回的是新的Promise对象,下面代码实现会说到)进行绑定回调。
Promise为了解决什么问题?
在ES6引入Promise主要是为了解决传统回调地狱(Callback Hell)的问题,这里SEO禅就不过多解释,不懂回调地狱自己搜索下。
Promise内部实现
简单了解了Promise是什么和它解决什么样的问题之后,SEO禅来带各位用代码实现一个简单的Promise。
Promise内部状态
首先我们要了解,Promise内部运作的机制,这里第一个要讲的是它的三种状态:
- 待定(pending): 初始状态,既没有被兑现,也没有被拒绝。
- 已兑现(fulfilled): 意味着操作成功完成。
- 已拒绝(rejected): 意味着操作失败。
一个Promise对象,必定是处于上面三种状态中的一种,所以我们的代码必须有这三种状态:
const PENDING = 'pending'
const FULFILLED = 'fulfilled'
const REJECTED = 'rejected'
下面我们可以回想下平时是怎么使用Promise的,是不是类似下面这样:
let promise = new Promise((resolve,reject)=>{

    let xhr = new XMLHttpRequest()
        xhr.open('Post','https://www.seozen.top')
        xhr.send('SEO优化')

    xhr.addEventListener('load',()=>{
       resolve('OK知道了')
    })
    xhr.addEventListener('error',()=>{
       reject('找不到SEO禅了')
    })
})

promise.then((result)=>{
   console.log(result) // OK知道了
}).catch((err)={
   console.log(err) // 不会执行
})可以看到我们在使用Promise实例化一个对象的时候,是通过参数传入一个函数,也就是说我们的Promise构造函数需要接收一个函数作为参数,这个函数有两个参数resolve和reject,那我们可以把Promise代码进行扩展下:
const PENDING = 'pending'
const FULFILLED = 'fulfilled'
const REJECTED = 'rejected'

function MyPromise(executor) {


  function resolve(result){}

  function reject(reason){}

  executor(resolve,reject)

}现在上面的代码是我们手工实现Promise函数的骨架,其中resolve和reject函数还没有实现,这个后面再讲,现在我们实例化Promise之后,又调用了then和catch方法去挂载处理函数,我们把这两个方法挂载在MyPromise的原型对象上,提供外部调用:
MyPromise.prototype.then = function(callback){}
MyPromise.prototype.catch = function(callback){}
在我们使用then和catch方法的时候,我们传入的回调函数都有接收一个参数,那这些参数哪里来的呢?看看之前的代码,其中resolve和reject是不是都有参数传入进去?现在我们就要实现resolve和reject这两个方法:
function resolve(result){
  if(this.status === PENDING) {
     this.status = FULFILLED
     this.result = result
  }
}

function reject(reason){
  if(this.status === PENDING) {
     this.status = REJECTED
     this.reason = reason
  }
}这两个函数的代码很简单,就是判断当前的状态是不是pending如果是,改变状态,保存用户传进来的值,现在我们实现下then和catch方法:
MyPromise.prototype.then = function (callback) {
    if(this.status === FULFILLED){
        typeof callback === 'function' && callback(this.result)
    }
};

MyPromise.prototype.catch = function (callback) {
    if(this.status === REJECTED){
        typeof callback === 'function' && callback(this.reason)
    }
};
上面这些代码组合起来基本就是第一版的Promise,把他们整合起来测试下:
 const PENDING = "pending";
 const FULFILLED = "fulfilled";
 const REJECTED = "rejected";


 function MyPromise(executor) {
   this.status = PENDING;
   this.result = undefined;
   this.reason = undefined;

   function resolve(result) {
     if (this.status === PENDING) {
       this.status = FULFILLED;
       this.result = result;
     }
   }

   function reject(reason) {
     if (this.status === PENDING) {
       this.status = REJECTED;
       this.reason = reason;
     }
   }

   executor(resolve.bind(this), reject.bind(this));
 }

 MyPromise.prototype.then = function(callback) {
   if (this.status === FULFILLED) {
     typeof callback === "function" && callback(this.result);
   }
 };

 MyPromise.prototype.catch = function(callback) {
   if (this.status === REJECTED) {
     typeof callback === "function" && callback(this.reason);
   }
 };

 let myPromise = new MyPromise((resolve, reject) => {
   resolve('这是第一版Promise')
   reject('这是错误信息,但是没有效果')
 })

 myPromise.then((result) => {
   console.log(result) // 这是第一版Promise
 })

 myPromise.catch((error) => {
   console.log(error) // 不会执行
 })
上面的代码SEO禅做了一处改造executor(resolve.bind(this), reject.bind(this));,因为resolve和reject内部都使用了this,这里使用bind来绑定这两个函数内部this的指向,因为他们是在executor内部直接调用,相当于this指向了window对象(非严格模式),this的指向问题具体内容,SEO禅会放在其他文章来说,当然你也可以使用let that = this的方式来保存this对象,在两个函数内部使用that来调用。
从上面代码我们看出来,一个Promise只有一种结束状态,状态只要确定,就不能再改变了,所以reject方法调用是无效的,这个从最开始的源码this.status === PENDING中也可以看出来,到这里最简单的版本应该算已经完成了,但是离真正的Promise还很远,下一篇文章SEO禅会分享,如何实现Promise异步和链式调用,这篇文章暂时就分享到这里。
作者:SEO禅
本文链接:JavaScript基础知识:搞定Promise,手写Promise代码实现
版权申明:如无特殊说明,本站文章均为作者原创,著作权归作者所有。商业转载请联系作者获得授权,非商业转载请注明出处,谢谢!


很久没写了,手生啊